 Save to Pinterest
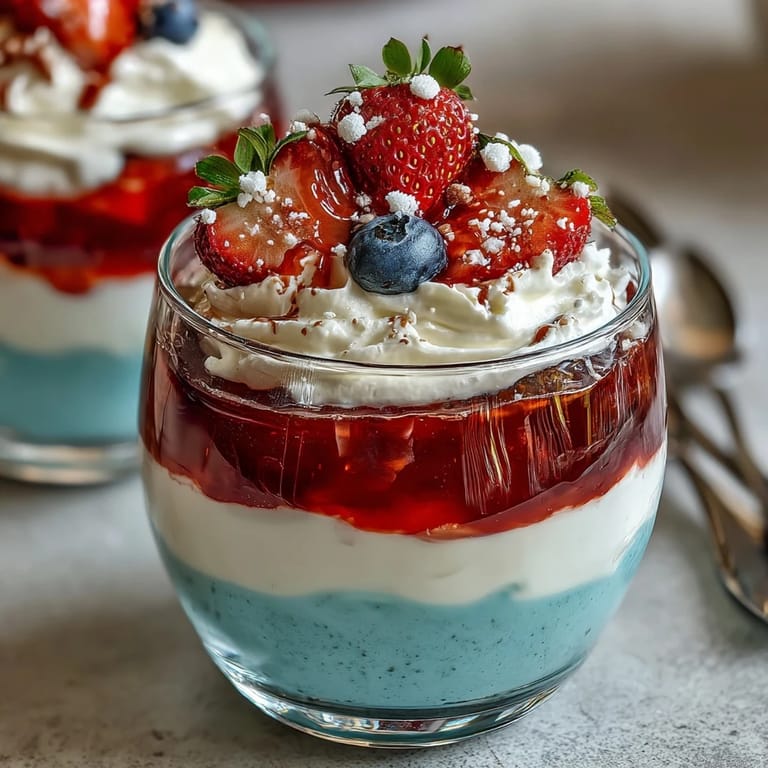
 My kids insisted on hosting a Fourth of July dessert stand in our driveway last summer, and I was scrambling for something that looked impressive but wouldn't melt in the heat. These layered Jello cups caught my eye because they're visually stunning without requiring any baking or complicated techniques. The moment I made the first batch and watched their faces light up at the red-white-blue stripes, I knew this was going to become our annual tradition.
There's something magical about watching the layers set in your fridge, each one revealing itself like a secret. I remember tilting those cups at an angle using a muffin tin and thinking I'd invented something brilliant, only to realize it's the oldest trick in the Jello book. But that moment of pride, even if misplaced, made the whole process feel special.
Ingredients
- Red Jello (strawberry or cherry): The bold start to your layers, this 3 oz box dissolves beautifully and sets quickly if you're patient enough to let it chill fully before adding the white layer.
- Boiling water: Use it immediately after it boils so your Jello dissolves evenly without lumps forming.
- Cold water: This stops the cooking process and helps achieve the perfect set without being too rubbery.
- Unflavored gelatin: The secret weapon for that creamy middle layer, it needs those five minutes to bloom in cold water first.
- Sweetened condensed milk: This transforms plain gelatin into something rich and cloud-like, creating that gorgeous opaque white middle that makes the colors pop.
- Blue Jello (blue raspberry): The grand finale that caps off your patriotic tower, this one goes on last when you're almost home free.
- Whipped cream and berries: Optional but honestly necessary, these finish the cup like you planned it all along.
Tired of Takeout? 🥡
Get 10 meals you can make faster than delivery arrives. Seriously.
One email. No spam. Unsubscribe anytime.
Instructions
- Set up your stage:
- Grab eight clear cups and arrange them so you have space to work without bumping them around. If you have a muffin tin, place it nearby to cradle those cups at an angle during the first chill.
- Build the red foundation:
- Pour boiling water over the strawberry Jello and stir until every granule dissolves, then add cold water to cool it down slightly. Divide this evenly among your cups, about two tablespoons each, then tilt those cups in the muffin tin and let them chill for 45 to 60 minutes until they're completely firm.
- Create the creamy white layer:
- Sprinkle your unflavored gelatin over cold water in a clean bowl and give it five minutes to bloom and absorb all that moisture. Pour boiling water over it and stir until it's completely dissolved, then stir in the sweetened condensed milk until you have a smooth, pourable mixture. Let this cool to room temperature before the next step.
- Pour the white magic:
- Once your red layer feels solid when you tap it, gently pour the white gelatin mixture over top, about two tablespoons per cup. Set them upright now and refrigerate for another 45 to 60 minutes until this layer firms up completely.
- Top with blue:
- Make your blue Jello by dissolving the powder in boiling water, adding cold water, and letting it cool to room temperature so it doesn't melt your white layer. Pour this gently over the white layer, about two tablespoons per cup, then let everything chill for at least two hours until it's completely set.
- The grand finish:
- Top each cup with whipped cream and scatter some fresh blueberries and strawberries across the top for a photo-worthy moment. Serve cold and watch people marvel at how you managed to get those layers so perfectly defined.
 Save to Pinterest
 My nephew asked if I'd made them from scratch and seemed genuinely disappointed when I told him about the Jello boxes. But then he realized the effort was in the technique and presentation, not the ingredients, and that made me proud in a different way. Sometimes the simplest recipes teach the best lessons about patience and precision.
The Angle Trick That Changes Everything
Tilting those cups in a muffin tin while the red layer sets is not just for show. When you set them at an angle, you're actually creating more surface area for the layer to chill evenly, which means fewer air bubbles and a cleaner line between colors. I learned this accidentally when I was running late and had to balance them however they fit, but now I do it intentionally every time.
Flavor Swaps That Work Beautifully
Once you understand how these layers work, you can swap flavors without guilt. I've made versions with lime and lemon, with different berry combinations, and even with a ginger ale twist instead of plain water in the blue layer. The white middle stays the star no matter what, so play around and find what speaks to you and your crowd.
Making These Ahead Like a Pro
These cups are actually better when made a day or two ahead because the layers have time to knit together and taste more cohesive. You can make them the morning of a party and they'll be perfectly set by evening, which gives you the afternoon to handle everything else. Just keep them covered in the back of the fridge so they don't absorb flavors from other foods.
- Cover your finished cups loosely with plastic wrap so they don't dry out.
- They keep beautifully for up to three days in the refrigerator.
- Add the whipped cream and fresh berries right before serving so they stay fresh and don't weep into the Jello.
 Save to Pinterest
 These cups turned out to be exactly what I needed that summer, and they've become our red-white-blue answer to any celebration. There's something deeply satisfying about making something beautiful that people actually enjoy eating.
Recipe FAQs
- → How do I achieve distinct layers in the cups?
Allow each layer to fully set in the refrigerator before adding the next to prevent mixing and maintain sharp lines.
- → Can I substitute ingredients for dietary needs?
Yes, use coconut milk and sugar instead of sweetened condensed milk for a dairy-free version while keeping layers creamy.
- → What is the best way to chill cups at an angle?
Place cups in a muffin tin tilted at a slight angle before refrigeration to create angled layers during the setting process.
- → How long should I chill each layer?
Chill the red and white layers about 45–60 minutes each until fully set; the final blue layer needs at least 2 hours.
- → Which flavors work best for the red and blue layers?
Strawberry or cherry is best for the red layer, and blue raspberry works well for the blue layer, providing vibrant color and taste.