Save to Pinterest
 My neighbor once knocked on the door holding a pink square wrapped in wax paper, and I thought it was soap. It was fudge, strawberry fudge, and it tasted like summer distilled into a single bite. I asked for the recipe immediately, scribbling notes on the back of a grocery receipt while she laughed at my urgency. That evening, I made my first batch, and the kitchen smelled like melted sugar and berry jam. I've been hooked ever since.
I brought these to a potluck once, stacked in a glass container, and watched them disappear before the main course was served. A friend asked if I'd used fresh berries, and I admitted the freeze-dried trick. She looked stunned, then relieved, because she'd been intimidating herself out of making fruity desserts for years. Sometimes the easiest path is also the most delicious.
Ingredients
- Digestive biscuits or graham crackers (200 g, finely crushed): The foundation of the crust, these add a toasted, slightly sweet crunch that holds up beautifully under the fudge layer.
- Unsalted butter (100 g, melted): Binds the crumbs together and adds richness without overpowering the fruit.
- White chocolate chips or chopped white chocolate (200 g): The creamy, mellow base that carries the strawberry flavor and sets into that signature fudge texture.
- Sweetened condensed milk (395 g, 1 can): This is what makes the fudge impossibly smooth and sweet, no candy thermometer required.
- Freeze-dried strawberries (50 g, ground to powder): The secret weapon for vibrant color and concentrated berry flavor without adding water that would soften the fudge.
- Pure vanilla extract (1 tsp): Rounds out the sweetness and adds a subtle warmth that complements the strawberry.
- Pinch of salt: Balances the sugar and makes every other flavor pop.
- Pink or red gel food coloring (1 to 2 drops, optional): If you want that eye-catching pink hue, a tiny bit goes a long way.
- Fresh strawberry slices and extra freeze-dried pieces (optional garnish): A pretty finishing touch that hints at what's inside.
Tired of Takeout? 🥡
Get 10 meals you can make faster than delivery arrives. Seriously.
One email. No spam. Unsubscribe anytime.
Instructions
- Prepare the pan:
- Line your 20 cm square baking pan with parchment paper, leaving a 2 to 3 cm overhang on two opposite sides so you can lift the whole slab out later. This little trick saves you from wrestling with a spatula.
- Make the crust:
- In a large bowl, mix the crushed biscuits with melted butter until every crumb is coated and the mixture holds together when you squeeze it. Press it firmly and evenly into the bottom of the pan, then pop it in the fridge for 10 minutes to set.
- Melt the fudge base:
- Place white chocolate chips and sweetened condensed milk in a heatproof bowl set over a saucepan of gently simmering water. Stir slowly and patiently until the chocolate melts completely and the mixture is silky smooth.
- Add the strawberry:
- Remove the bowl from heat and stir in the freeze-dried strawberry powder, vanilla extract, salt, and food coloring if using. Mix until the color is uniform and the powder is fully incorporated with no streaks.
- Assemble and chill:
- Pour the strawberry fudge mixture over the chilled crust, spreading it evenly with a spatula to reach every corner. Cover loosely with plastic wrap and refrigerate for at least 2 to 3 hours, or until the fudge is firm to the touch.
- Slice and serve:
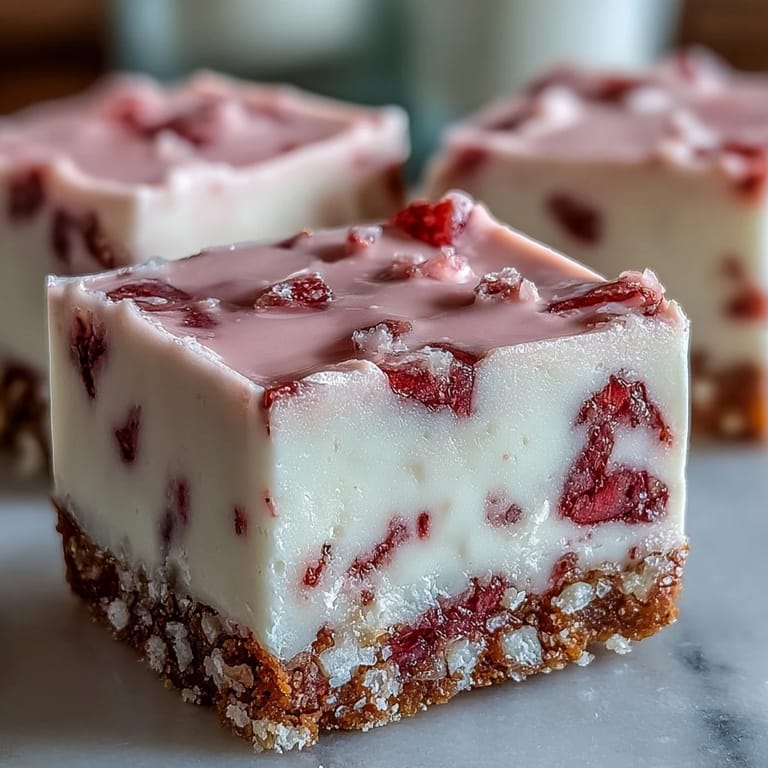
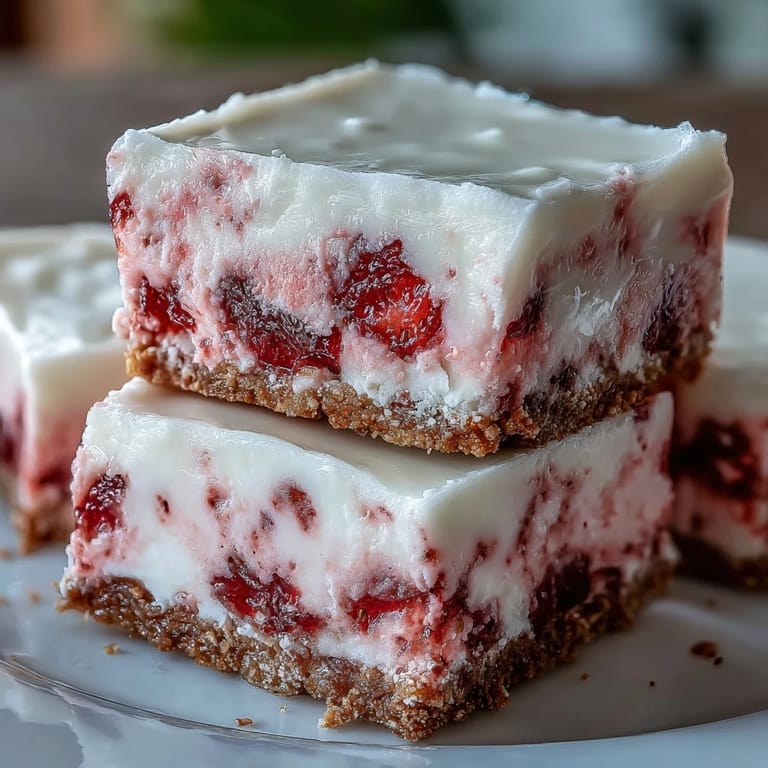
- Lift the fudge out using the parchment overhang, transfer to a cutting board, and slice into 16 squares with a sharp knife, wiping the blade between cuts for clean edges. Garnish with fresh strawberry slices or extra freeze-dried pieces, and serve chilled or slightly softened.
 Save to Pinterest
 One afternoon, my daughter helped me press the crust into the pan, her small hands flattening it with more enthusiasm than precision. We poured the pink fudge together, and she asked if we could eat it right away. I explained the waiting, and she set a timer, checking it every ten minutes. When we finally cut the squares, she bit into one and grinned, declaring it worth every second. That's when I knew this recipe was a keeper.
Choosing Your Strawberry
Freeze-dried strawberries are the clear winner here because they deliver concentrated flavor without adding moisture that would throw off the fudge's texture. You can find them in the snack aisle or baking section of most grocery stores. If you use fresh strawberries, you'll need to puree and strain them to remove seeds and excess liquid, then be prepared for a slightly softer set. I've done both, and the freeze-dried version wins every time for ease and consistency.
Storage and Serving
These squares keep beautifully in an airtight container in the refrigerator for up to five days, though they rarely last that long in my house. Let them sit at room temperature for about 10 minutes before serving if you prefer a softer, creamier bite. If you're taking them to a party, layer them between sheets of parchment in a flat container to prevent sticking. They travel well and always arrive looking as good as they taste.
Customizing Your Fudge
Once you've mastered the basic recipe, the variations are endless. Swap the strawberry powder for raspberry or blueberry, or swirl in a spoonful of crushed fresh berries for a marbled effect. For a dairy-free version, use coconut condensed milk and dairy-free white chocolate, and the results are surprisingly close to the original. You can also press a layer of chopped nuts into the crust for extra crunch, or drizzle melted dark chocolate over the top for a sophisticated finish.
- Adjust the strawberry intensity by adding more or less freeze-dried powder to suit your taste.
- Try a mix of digestive biscuits and vanilla wafers in the crust for a subtly different flavor.
- Dust the tops with a light sprinkle of coarse sugar crystals before chilling for a sparkly finish.
 Save to Pinterest
 There's something quietly satisfying about pulling a tray of these from the fridge, cutting them into perfect pink squares, and watching people light up at the first bite. They're proof that you don't need fancy equipment or hours of labor to make something memorable.
Recipe FAQs
- → Can I use fresh strawberries instead of freeze-dried?
While fresh strawberries can be puréed and strained, freeze-dried strawberries are preferred because they provide concentrated flavor without adding excess moisture. If using fresh purée, reduce the amount to 100g and strain thoroughly to prevent the fudge from becoming too soft.
- → How long do these squares need to chill before serving?
The fudge layer requires at least 2-3 hours in the refrigerator to firm completely. For the cleanest cuts, chill for the full 3 hours. You can also make these a day in advance—the flavor develops beautifully overnight.
- → Can I make these dairy-free?
Yes. Substitute dairy-free white chocolate chips and coconut condensed milk for the traditional ingredients. Use dairy-free butter or coconut oil for the crust. The texture may vary slightly but remains delicious.
- → Why is my fudge layer not setting properly?
This usually happens if too much fresh fruit purée is used or if the mixture wasn't heated enough to properly melt the chocolate. Ensure the white chocolate is completely melted and smooth before adding the strawberry powder. If using fresh purée, strain it thoroughly and measure precisely.
- → How should I store these squares?
Store in an airtight container in the refrigerator for up to 5 days. Place parchment paper between layers if stacking to prevent sticking. Let them stand at room temperature for 10 minutes before serving for a softer, creamier texture.
- → Can I freeze these strawberry fudge squares?
Yes, freeze them for up to 2 months. Wrap the whole slab tightly in plastic and foil, or freeze individual squares in a freezer-safe container. Thaw overnight in the refrigerator before serving. Note that fresh strawberry garnishes don't freeze well.