 Save to Pinterest
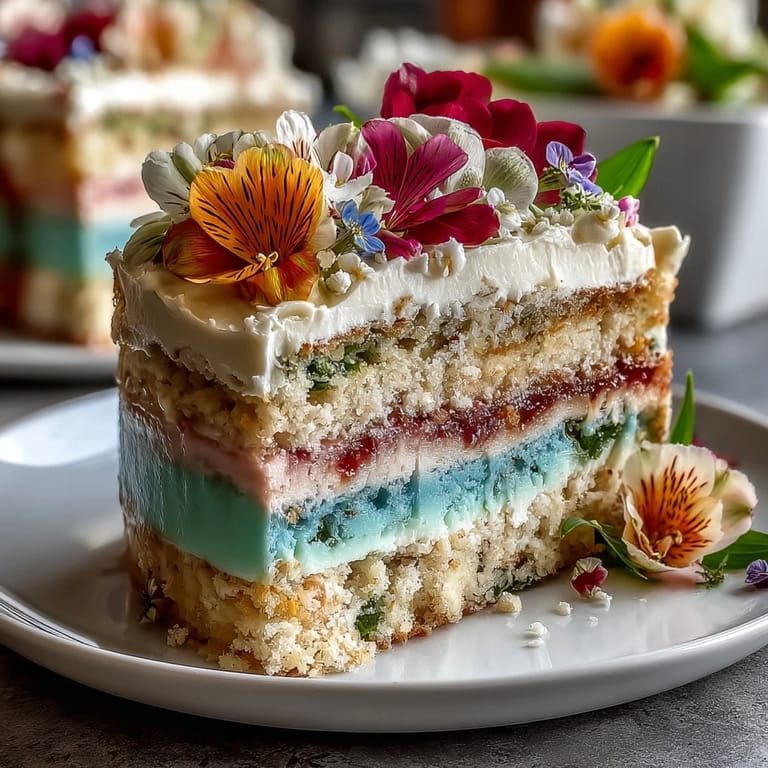
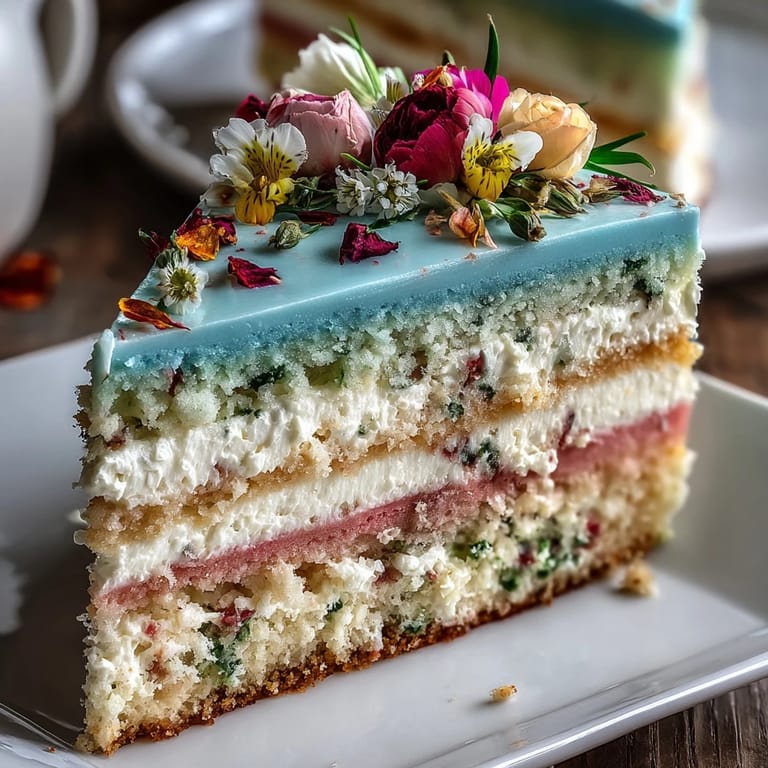
 Sometime last April, I found myself surrounded by fragrant petals as sunlight spilled through the kitchen window& It was the kind of afternoon when quiet creativity felt right, and making this pastel ombre spring cake turned into a joyful experiment in color and texture rather than a simple bake& The gentle transition of shades reminded me of the garden waking after winter, and I learned just how much patience layering can teach& The scent of vanilla and butter mixed with floral notes from the edible blossoms, filling the air with a hint of spring celebration& By the time I finished the ombre frosting, my hands wore streaks of pink, green, and yellow—a mark of the best kind of kitchen messes&
I made this for an impromptu spring birthday where the only plan was laughter and dessert& That day, we crowded around the counter, dusting edible petals while someone joked about hosting the next season of Bake Off& We nicknamed the cake &"petal parade,&" and no one could resist sneaking a finger of buttercream as the ombre layers came together& The gradient colors drew so much attention that guests delayed dinner just to admire it from every angle& Watching the last slice disappear, I realized how much joy a playful dessert brings to a room&
Ingredients
- All-purpose flour: Sifting gives your cake a soft crumb, and using the freshest flour prevents a dull taste&
- Baking powder and baking soda: Measure with care& Too much makes the layers dome and crack&
- Unsalted butter: Room temperature helps blend it airy without overworking—my kitchen trick is to unwrap it an hour before&
- Granulated sugar: Cream it long enough for a light texture& If you rush, the cake turns heavy&
- Eggs: Let them sit out so they emulsify properly& Cold eggs sometimes split the batter&
- Pure vanilla extract: Adds depth; don’t substitute unless you want to lose that signature bakery aroma&
- Whole milk: Helps create tender layers& Skim won’t deliver the same richness&
- Gel food coloring: For pastel hues, a toothpick swirl is enough& Too much looks harsh&
- Powdered sugar: Sifted for fluff—never skip it or you get lumpy frosting&
- Edible flowers: Always ensure they’re organic and safe to eat& I learned most store bouquets aren’t edible&
Tired of Takeout? 🥡
Get 10 meals you can make faster than delivery arrives. Seriously.
One email. No spam. Unsubscribe anytime.
Instructions
- Preheat and Prepare:
- Set your oven to 350°F (175°C), and as you grease three pans, imagine the colors they’ll hold& Line each with parchment so the cake slides out easily&
- Mix Dry Ingredients:
- In one bowl, whisk together flour, baking powder, soda, and salt, feeling the softness between your fingers& Light flour is the key to a feathery crumb&
- Blend Butter and Sugar:
- Beat butter and sugar until fluffy—listen for the shift in sound as it lightens& Each egg goes in separately, with vanilla swirling at the end&
- Combine Wet and Dry:
- Alternate flour mix and milk into your main bowl, scraping down sides, until it’s barely blended& The batter turns silky, not stiff&
- Color and Divide:
- Spoon the batter into three bowls& Add pastel gel—pink, yellow, green, or blue—then gently mix until each is softly tinted&
- Bake Layers:
- Pour colored batters into pans& Bake 25–30 minutes until a toothpick tests clean& Let them cool for ten minutes, then loosen them onto racks&
- Frosting Magic:
- Beat butter for buttercream until creamy& Gradually add powdered sugar, vanilla, and milk, then divide and tint as desired& Make each color delicate&
- Assemble Layers:
- Level cakes if needed& Layer with buttercream, crumb coat, chill, then finish the ombre blend using an offset spatula&
- Petal Finale:
- Arrange edible flowers on top before serving& Treat it like decorating a spring bouquet&
 Save to Pinterest
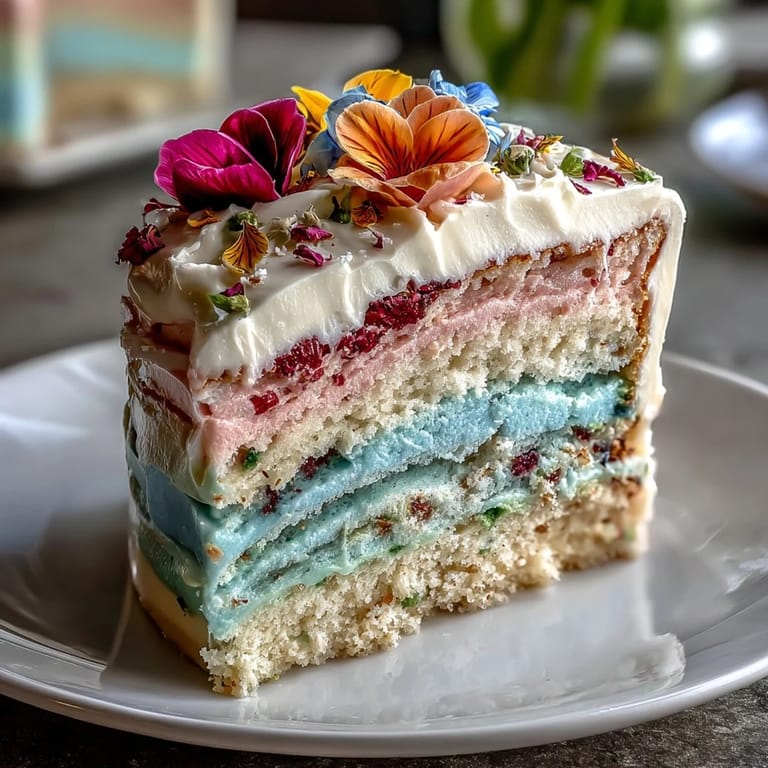
 This cake became a signpost of celebration on my table& When friends saw their names spelled in petals, smiles lasted longer than the food itself& The ritual of placing edible blooms felt almost meditative, and I found myself lingering, making sure every flower looked just right& There isn’t another dessert where artistry and taste intertwine so simply& It always marks a cheerful occasion&
The Real Secret to Ombre Frosting
Blending the pastel buttercream takes patience, not perfection& The trick is to start from light shades at the bottom and work upward, letting colors overlap slightly with your spatula& Sometimes I step back, squint, and soften rough edges with extra swoops& Each layer is forgiving—and even mistakes end up looking intentional&
How to Keep Cake Layers Moist and Fluffy
Switching between dry and wet ingredients gently prevents the cake from becoming dense& Always scrape the bowl down so dry pockets disappear& I once tried a shortcut and the layers turned tough& Slow mixing keeps the texture cloud-light from edge to center&
Edible Flower Arrangement Tips
Choose flowers with simple shapes and vivid colors& Spread them softly across the top, like arranging a miniature meadow rather than a formal bouquet& Always check for stems or leaves not meant for eating& The petals add delight without overpowering flavor&
- Use tweezers for precise placement&
- Keep blooms in the fridge before topping for freshness&
- Add flowers just before serving so they don’t wilt&
 Save to Pinterest
 May the pastel ombre cake bring brightness to your spring, and may every slice carry a hint of magic from your kitchen to the table& Sharing it always inspires new memories&
Recipe FAQs
- → How do I achieve the ombre effect in the layers?
Tint each cake batter portion with different pastel gel colors and bake separately. The gradient forms when stacking layers.
- → What kind of edible flowers are best for the topper?
Organic pansies, violas, roses, and chamomile are ideal. Always ensure flowers are labeled as edible and pesticide-free.
- → Can I make the cake vegan?
Yes, use plant-based butter, milk, and egg replacers. Confirm your substitutes work well for baking and frosting texture.
- → How do I prevent pastel colors from fading?
Use gel food coloring for vivid hues. Avoid liquid coloring, as it can dilute colors and affect cake texture.
- → What tools are helpful for assembling the cake?
Three round pans, mixer, mixing bowls, spatulas, wire rack, and optional cake turntable ensure easy and neat assembly.
- → Are there any common allergens to consider?
Contains wheat, eggs, milk, and possibly flower allergens. Use vegan substitutes to accommodate dietary needs.